Astro
初始化项目
项目的初始化需要node版本为偶数并且>18。npm的管理可参考Web前端的:NPM管理器
创建项目
npm create astro@latest

Need to install the following packages:
create-astro@5.0.5
Ok to proceed? (y) # 是否安装以下包

 astro   Launch sequence initiated.
   dir   Where should we create your new project? # 项目文件夹的名称
         ./short-shepherd

  tmpl   How would you like to start your new project?
         > A basic, helpful starter project (recommended) # 基本的入门项目
         — Use blog template # 博客模板
         — Use docs (Starlight) template # 文档模板
         — Use minimal (empty) template # 一个最小,空白模板,学习我们选择这个

  deps   Install dependencies? (recommended)
         ● Yes  ○ No # 是否安装依赖

   git   Initialize a new git repository? (optional)
         ● Yes  ○ No # 是否初始化git仓库
启动项目
npm run dev我们认识初始化的目录架构
.astro
├── collections        // Astro 内容集合(Content Collections)的缓存数据
├── settings.json      // Astro 内部的项目设置缓存
└── types.d.ts         // 自动生成的 TypeScript 类型定义文件(用于编辑器提示)

node_modules		   // 依赖

public                 // 【静态资源目录】
├── favicon.ico        // 网站图标(构建时会原样复制到输出目录根路径)
└── favicon.svg        // SVG 格式的图标

src \ pages            // 【页面路由目录】,我们主要书写这个文件夹下的内容
└── index.astro        // 首页文件(对应网站根路径 /),Astro 组件文件

.gitignore             // Git 版本控制忽略文件列表(如 node_modules, .astro 等)

astro.config.mjs       // 【Astro 核心配置文件】配置集成、构建选项、重定向等

package-lock.json      // npm 依赖包的版本锁定文件(确保团队环境一致)

package.json           // 【项目元数据】包含项目名称、脚本命令(scripts)、依赖包列表等

README.md              // 项目说明文档

tsconfig.json          // TypeScript 配置文件(配置编译选项、路径别名等)
页面
Astro的使用与Vue基本一致,Astro做了很多的路由已经特性,下面我们开始制作一个页面
查看目录,网站默认访问:src \ pages \ index.astro , 默认顶级目录是:src \ pages
--- 有需要时使用
Frontmatter(前置元数据) 或 组件脚本区,这是你在 Astro 文件中编写 JavaScript 或 TypeScript 代码 的地方。这些代码只在 服务器端(构建时)执行,不会发送到浏览器。发送到浏览器的就是已经构建好的html代码
---

<html lang="en">
  <head>
    <meta charset="utf-8" />
    网页编码
    <link rel="icon" type="image/svg+xml" href="/favicon.svg" />
    网页地址栏图标
    <link rel="icon" href="/favicon.ico" />
    <meta name="viewport" content="width=device-width" />
    启用响应式布局
    <meta name="generator" content="{Astro.generator}" />
    身份标识,使用什么技术构建
    <title>Astro</title>
    标题
  </head>
  <body>
    <h1>Astro</h1>
  </body>
</html>
创建页面
HTML页面
- 尝试在同级目录创建:
about.astro - 浏览器直接访问:
http://localhost:4321/about去掉文件后缀名,会帮我们自动路由
---
---

<html lang="en">
  <head>
    <meta charset="utf-8" />
    <link rel="icon" type="image/svg+xml" href="/favicon.svg" />
    <link rel="icon" href="/favicon.ico" />
    <meta name="viewport" content="width=device-width" />
    <meta name="generator" content="{Astro.generator}" />
    <title>Astro</title>
  </head>
  <body>
    <h1>关于我</h1>
  </body>
</html>
MD文件编写
作为一个静态的内容驱动的框架,写文档是最主要的功能。Astro会自动帮我们将MD转换为HTML
- 创建目录:
src/pages/posts/在src/pages下的目录自定义 - 创建一个md文档:
post-1.md - 访问:
http://localhost:4321/posts/post-1 即可访问到我们写的md文档,发现了吗,在src/pages下的文件,我们只要跟上目录名/文件名即可访问
---
title: "我的第一篇博客文章"
pubDate: 2022-07-01
description: "这是我 Astro 博客的第一篇文章。"
author: "Astro 学习者"
image:
  url: "https://docs.astro.build/assets/rose.webp"
  alt: "The Astro logo on a dark background with a pink glow."
tags: ["astro", "blogging", "learning in public"]
---

# 我的第一篇博客文章 发表于:2022-07-01 欢迎来到我学习关于 Astro
的新博客!在这里,我将分享我建立新网站的学习历程。 ## 我做了什么 1. **安装
Astro**:首先,我创建了一个新的 Astro 项目并设置好了我的在线账号。 2.
**制作页面**:然后我学习了如何通过创建新的 `.astro` 文件并将它们保存在
`src/pages/` 文件夹里来制作页面。 3.
**发表博客文章**:这是我的第一篇博客文章!我现在有用 Astro 编写的页面和用
Markdown 写的文章了! ## 下一步计划 我将完成 Astro
教程,然后继续编写更多内容。关注我以获取更多信息。
注意
当我们在一个文件夹下创建index.astro文件时,这个文件将会成为这个目录的默认访问页面。
Frontmatter-区域
这里介绍astro特有的格式,它定义了行为,变量,并且不会返回给前端
---
---
我们来了解它的作用
编辑index.astro文件
- 定义一个变量并使用:语法规则
JavaScript,引用变量使用{变量名}
---
const pageTitle = "关于我";

const identity = {
  firstName: "莎拉",
  country: "加拿大",
};

const skills = ["HTML", "CSS"];
---

<html lang="en">
  <head>
    <meta charset="utf-8" />
    <link rel="icon" type="image/svg+xml" href="/favicon.svg" />
    <link rel="icon" href="/favicon.ico" />
    <meta name="viewport" content="width=device-width" />
    <meta name="generator" content="{Astro.generator}" />
    <title>{pageTitle}</title>
  </head>
  <body>
    <!-- 使用单个变量 -->
    <h1>页面:{pageTitle}</h1>
    <!-- 使用对象属性: -->
    <h2>姓名:{identity.firstName}</h2>
    <h2>国家:{identity.country}</h2>
    <!-- 使用数组和循环: -->
    <h2>技能:</h2>
    <ul>
      {skills.map((skill) =>
      <li>{skill}</li>
      )}
    </ul>
  </body>
</html>
语法
这里的语法基本和JS一致,可照看VUE相关语法
定义变量
全局变量:可重复定义遵循就近原则 var 变量名 = 值; var app = "1"
局部变量:不允许重复声明 let 变量名 = 值;let app = 1 定义常量: const 变量名 =
值;const app = 1 数据类型: number:数字(整数,小数,负数)
string:字符(“”/''都可) boolean:布尔 null:空
undefined:变量定义未初始化时的默认值 定义一个结构体: interface Book { title:
string; author: string; } 使用这个结构体定义一个数组 const books: Book[] = [ {
title: "new", author: "Joe" }, { title: "Will", author: "James" }, ];
{ } -VUE中{{}}的插值
{pageTitle} 得到定义的变量名的值 {identity.firstName} 得到对象属性 {age + 10}
简单的数学运算,const age = 10
循环函数
{skills.map((skill) =>
<li>{skill}</li>
)} 对skills进行循环遍历,临时变量名skill,循环内容
<li>{skill}</li>
条件
---
const happy = true;
const goal = 3;
---

<!-- if判断 :变量 && 执行内容 -->
{happy &&
<p>我非常乐意学习 Astro!</p>
}
<!-- 三元运算符号: 变量 ? true执行 : 否则执行 -->
{goal === 3 ?
<p>我的目标是在三天内完成。</p>
:
<p>我的目标不是 3 天。</p>
}
style- 样式标签
定义样式,使用与HTML一致
---
---

<html lang="en">
  <head>
    <meta charset="utf-8" />
    <link rel="icon" type="image/svg+xml" href="/favicon.svg" />
    <link rel="icon" href="/favicon.ico" />
    <meta name="viewport" content="width=device-width" />
    <meta name="generator" content="{Astro.generator}" />
    <style>
      h1 {
        color: purple; 紫色
        font-size: 4rem;
      }
    </style>
  </head>
  <body>
    <h1>hello</h1>
  </body>
</html>
定义样式变量
- 指令:
define:vars
---
const skillColor = "crimson"; 定义颜色
---

<html lang="en">
  <head>
    <style define:vars="{{" skillColor }}>
      将JS定义的内容给到css区域 h1 {
        color: green;
        color: var(--skillColor);
        font-weight: bold;
      }
    </style>
  </head>
  <body>
    <h1>hello</h1>
  </body>
</html>
引入全局/外部CSS文件
- 创建文件夹:
src/styles/,编写CSS文件:global.css
h1 { color: aqua; margin: 1rem 0; font-size: 2.5rem; }引入这个CSS文件:import
---
import "../styles/global.css";
---

<html lang="en">
  <head> </head>
  <body>
    <h1>hello</h1>
  </body>
</html>
创建组件
这里的概念与VUE的组件概念一致,编写一个公共的HTML文件,在需要使用时进行引入即可
一般存放在:src/components/ 文件夹中
一个基础组件
- 创建文件:
Navigation.astro
<a href="/">首页</a>
<a href="/about/">关于</a>
<a href="/blog/">博客</a>
使用
- 引入的原理是直接将里面的内容放在引入的位置
---
import Navigation from "../components/Navigation.astro";
---

<html lang="en">
  <head>
    <meta charset="UTF-8" />
  </head>
  <body>
    <Navigation />
    <h1>hello</h1>
  </body>
</html>
向组件传入变量
- 创建组件:
Social.astro,接收参数:Astro.props;(传入的参数都会放在这个中)
---
const { platform, username } = Astro.props;
---

<a href={`https://www.${platform}.com/${username}`}>{platform}</a>
使用:
---
import Navigation from "../components/Navigation.astro";
import Social from "../components/Social.astro";
---

<html lang="en">
  <head>
    <meta charset="UTF-8" />
  </head>
  <body>
    <Navigation />
    <!--组件1:导航-->
    <h1>hello</h1>
    <Social platform="twitter" username="example" />
    <!--直接使用属性即可传入想要的变量-->
  </body>
</html>这里我们可以向Social组件传递任何值,不会有任何检查与提示,若我们想规定这个页面,如何做?
- 使用
interface Props进行限定
组件: --- interface Props { 定义数据格式 book: { title: string; author: string;
}; } const { book } = Astro.props; 接收数据 ---
<html>
  <head>
    <meta charset="utf-8" />
  </head>
  <div>
    <p>Book</p>
    <p>书名:{book.title}--作者:{book.author}</p>
    使用数据
  </div>
</html>

调用组件: --- import Autor from "./autor.astro"; 导入组件 interface Book {
定义Book的数据格式 title: string; author: string; } const books: Book[] = [
填充数据 { title: "new", author: "Joe" }, { title: "Will", author: "James" }, ];
---

<html lang="en">
  <head>
    <meta charset="utf-8" />
  </head>

  <body>
    <h1>Astro</h1>
    <a href="/autor">关于</a>
    <a href="/">首页</a>
    { books.map((book) => { return <Autor book="{book}" />; 向组件传递数据 }) }
  </body>
</html>
script-脚本
上面我们学的都是在服务器组装好HTML直接在浏览器显示,下面介绍交互应该怎么做
Astro 内置对TypeScript支持
---
// 为什么不写在这里?这里的内容在离开服务器后就不存在了,所以用户端的交互只能写在HTML中,包括变量等,编译完成后就失效
---

<html lang="en">
  <head>
    <meta charset="UTF-8" />
  </head>
  <body>
    <!-- 1. 给 h1 一个 ID,方便 JS 找到它 -->
    <h1 id="my-text">Hello</h1>
    <!-- 2. 添加一个按钮 -->
    <button id="toggle-btn">切换文字</button>

    <script>
      // 3. 在浏览器端定义变量
      let isDisplay = true;

      // 获取 DOM 元素
      const textElement = document.getElementById("my-text");
      const btnElement = document.getElementById("toggle-btn");

      // 4. 监听点击事件
      btnElement.addEventListener("click", () => {
        // 事件"click",点击
        // 切换变量状态
        isDisplay = !isDisplay;

        // 根据变量修改网页内容
        isDisplay
          ? (textElement.innerText = "Hello")
          : (textElement.innerText = "Goodbye");
      });
    </script>
  </body>
</html>
也可以将这个逻辑写在外部,引入即可:
- 编写:
src/scripts/menu.js
// 3. 在浏览器端定义变量
let isDisplay = true;

// 获取 DOM 元素
const textElement = document.getElementById("my-text");
const btnElement = document.getElementById("toggle-btn");

// 4. 监听点击事件
btnElement.addEventListener("click", () => {
  // 事件"click",点击
  // 切换变量状态
  isDisplay = !isDisplay;

  // 根据变量修改网页内容
  isDisplay
    ? (textElement.innerText = "Hello")
    : (textElement.innerText = "Goodbye");
});
引入:
<html lang="en">
  <head>
    <meta charset="UTF-8" />
  </head>
  <body>
    <!-- 1. 给 h1 一个 ID,方便 JS 找到它 -->
    <h1 id="my-text">Hello</h1>
    <!-- 2. 添加一个按钮 -->
    <button id="toggle-btn">切换文字</button>

    <script>
      import "../scripts/menu.js";
    </script>
  </body>
</html>
布局
将一些固定的格式,提取出来,做成组件,方便布局,并通过变量传递等改变模块的一些内容。
一般存放在:src/layouts
创建一个页面布局
- 创建:
BaseLayout.astro - 我们使用
<slot />插槽 展示我们多余展示的内容,这里插槽类似于VUE的插槽
---
const { pageTitle } = Astro.props;
---

<html lang="zh-CN">
  <head>
    <meta charset="utf-8" />
    <link rel="icon" type="image/svg+xml" href="/favicon.svg" />
    <meta name="viewport" content="width=device-width" />
    <meta name="generator" content="{Astro.generator}" />
    <title>{pageTitle}</title>
  </head>
  <body>
    <h1>{pageTitle}</h1>
    <slot />
  </body>
</html>
使用:
---
import BaseLayout from "../layouts/BaseLayout.astro";
---

<BaseLayout pageTitle="首页">
  <h2>我超棒的博客副标题</h2>
</BaseLayout>
注意:
若我们在布局文件中定义了`样式`,这个样式并不会影响到调用时插槽插入的内容,因为这个样式的作用域是这个布局文件。Astro是怎样做的?在最终编译时会使用date将这个css划定为特定的范围。编写时:
<h1>Astro</h1>
<style>
h1 {
color: red;
}
</style>
最终编译结果:
<h1 data-astro-cid-j7pv25f6="">Astro</h1>
h1[data-astro-cid-j7pv25f6] { color: red; }若我们想将这个样式覆盖到所有使用这个布局的页面时可以添加属性 <style is:global> ,告诉Astro这个样式规则不受范围限制,会取出date属性
<style is:global>
  h1 {
    color: red;
  }
</style>
使用布局嵌入MD文档
- 创建一个布局组件:
MarkdownPostLayout.astro
---
const { frontmatter } = Astro.props;
---

<meta charset="utf-8" />
<h1>{frontmatter.title}</h1>
<p>作者:{frontmatter.author}</p>
<slot />
在MD文件中引入这个布局:
---
layout: ../../layouts/MarkdownPostLayout.astro
title: "我的第一篇博客文章"
pubDate: 2022-07-01
description: "这是我 Astro 博客的第一篇文章。"
author: "Astro 学习者"
image:
  url: "https://docs.astro.build/assets/rose.webp"
  alt: "The Astro logo on a dark background with a pink glow."
tags: ["astro", "blogging", "learning in public"]
---

# 我的第一篇博客文章 发表于:2022-07-01 欢迎来到我学习关于 Astro
的新博客!在这里,我将分享我建立新网站的学习历程。 ## 我做了什么 1. **安装
Astro**:首先,我创建了一个新的 Astro 项目并设置好了我的在线账号。 2.
**制作页面**:然后我学习了如何通过创建新的 `.astro` 文件并将它们保存在
`src/pages/` 文件夹里来制作页面。 3.
**发表博客文章**:这是我的第一篇博客文章!我现在有用 Astro 编写的页面和用
Markdown 写的文章了! ## 下一步计划 我将完成 Astro
教程,然后继续编写更多内容。关注我以获取更多信息。
查看页面多了哪些内容?
- 在开头多了:我的第一篇博客文章,作者:Astro 学习者。
- 这些内容来自哪里:在引入组件时
const { frontmatter } = Astro.props;,整个页面中--- ---定义的内容都会给frontmatter - 原本MD的文本被
<slot />使用
Astro
上面介绍了基本的使用,下面我们将介绍Astro提供给我们的一些API,以及特色功能
内容集合
使用Json,MD,远程连接等获取数据。并在有需要时可供我们调用
我们一般将数据文件存放在:src/content
JSON
准备一个Json图书数据:books.json
[ 我们需要ID属性来区分数据源 { "id": "1", "title": "new", "author": "Joe" }, {
"id": "2", "title": "Will", "author": "James" } ]在src下创建一个配置文件:content.config.ts定义所有的内容集合
// 加载数据源的函数
import { defineCollection } from "astro:content";
// 文件加载器
import { file } from "astro/loaders";
// zod 属性定义
import { z } from "astro/zod";

// 定义一个内容集合
const books = defineCollection({
  // 需要两个参数:数据源,内容格式(可选)
  loader: file("src/content/books.json"), // Astro提供了多个加载器可用,file读取单个文件,glob
  schema: z.object({
    id: z.string(),
    title: z.string(),
    money: z.number(),
  }),
});

// 导出这个内容集合
export const collections = { books };
内容组件:autor.astro
---
import type { CollectionEntry } from "astro:content";

interface Props {
  book: CollectionEntry<"books">; // 注意这里的类型我们需要从配置文件中读取book对应的数据类型
}

const { book } = Astro.props;
---

<html>
  <head>
    <meta charset="utf-8" />
  </head>

  <div>
    <!-- 注意:内容集合是一个特殊的集合,数据都在data中 -->
    <p>书名:{book.data.title}--金额:{book.data.money}</p>
  </div>
</html>
使用:
---
// 导入展示组件
import Autor from "./autor.astro";

// 导入所需函数
import { getCollection } from "astro:content";
// 获取数据
const books = await getCollection("books");
---

<html lang="en">
  <head>
    <meta charset="utf-8" />
  </head>

  <body>
    <h1>Astro</h1>
    {books.map((book) => <Autor book={book} />)}
  </body>
</html>
MD
读取MD文档中的数据并展示
建立MD文档:
	book1.md (不需要ID属性,Astro会将文件名作为ID)
---
title: "明天会更好"
money:10
---

# 明天会更好的!

	book2.md (不需要ID属性,Astro会将文件名作为ID)
---
title: "今天会更好"
money:20
---

# 今天会更好的!创建配置文件读取:content.config.ts
// 加载数据源的函数
import { defineCollection } from "astro:content";
// 文件加载器
import { glob } from "astro/loaders";
// zod 属性定义
import { z } from "astro/zod";

// 定义一个内容集合
const books = defineCollection({
  // 需要两个参数:数据源,内容格式(可选)
  loader: glob({ base: "src/content", pattern: "*.md" }), // 加载多个文件,base指定基础路径,pattern:指定文件格式
  schema: z.object({
    title: z.string(),
    money: z.number(),
  }),
});

// 导出这个内容集合
export const collections = { books };
使用不变:因为Astro将内容集合进行了统一
---
// 导入展示组件
import Autor from "./autor.astro";

// 导入所需函数
import { getCollection } from "astro:content";
// 获取数据
const books = await getCollection("books");
---

<html lang="en">
  <head>
    <meta charset="utf-8" />
  </head>

  <body>
    <h1>Astro</h1>
    {books.map((book) => <Autor book={book} />)}
  </body>
</html>
展示组件:
---
import type { CollectionEntry } from "astro:content";

interface Props {
  book: CollectionEntry<"books">;
}

const { book } = Astro.props;
---

<html>
  <head>
    <meta charset="utf-8" />
  </head>

  <div>
    <!-- 注意:内容集合是一个特殊的集合,数据都在data中,注意使用glob时id为文件的名称 -->
    <p>书名:{book.data.title}--金额:{book.data.money}--id:{book.id}</p>
  </div>

</html>
动态路由
Astro作为一个文档驱动的网站,我们在写完一篇文档后总想它可以自动生成路由,而不是我们每次都手动添加。原理时在构建阶段自动生成多个Astro页面
当前的项目结构:
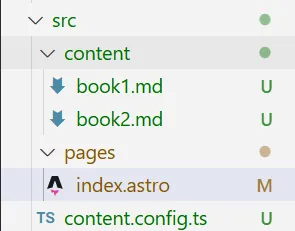
创建一个动态页面:[id].astro
---
import { render } from "astro:content";
import { getCollection } from "astro:content";
import { boolean } from "astro:schema";
//  我们需要返回getStaticPaths()函数,告诉Astro需要生成哪些静态页面
export async function getStaticPaths() {
  const books = await getCollection("books"); // 我们需要的到书籍数组,书籍数据解析查看content.config.ts配置问文件
  // 返回要生成页面的数据列表
  return books.map((book) => {
    // 每个页面需要有两个属性:
    return {
      params: { id: book.id }, // 这里的ID对应我们在可变文件上的[id].astro,将会生成一个:动态id.astro 的页面,通过  /路径/动态id即可访问
      props: { book }, // 内容
    };
  });
}

// 得到页面数据
const { book } = Astro.props;
// 得到页面的MD内容
const { Content } = await render(book);
---

<html lang="en">
  <head>
    <meta charset="utf-8" />
  </head>
  <body>
    <h1>书籍内容</h1>
    <p>标题:{book.data.title} 价格:{book.data.money}</p>
    <!-- MD的内容 -->
    <Content />
  </body>
</html>这里MD的内容从哪里来呢?内容集合:content.config.ts
// 加载数据源的函数
import { defineCollection } from "astro:content";
// 文件加载器
import { glob } from "astro/loaders";
// zod 属性定义
import { z } from "astro/zod";

// 定义一个内容集合
const books = defineCollection({
  // 需要两个参数:数据源,内容格式(可选)
  loader: glob({ base: "src/content", pattern: "*.md" }), // 加载多个文件,base指定基础路径,pattern:指定文件格式
  schema: z.object({
    title: z.string(),
    money: z.number(),
  }),
});

// 导出这个内容集合
export const collections = { books };
MD文档的内容:
	book1.md (不需要ID属性,Astro会将文件名作为ID)
---
title: "明天会更好"
money:10
---

# 明天会更好的!

	book2.md (不需要ID属性,Astro会将文件名作为ID)
---
title: "今天会更好"
money:20
---

# 今天会更好的!访问:http://localhost:4321/book1即可得到

服务端渲染
在使用Astro时,我们大多数时使用在编译阶段就已经生成的页面,若我们想做个人页面等根据用户信息动态生成的页面,或者展示数据频繁变动的页面时,我们可以采用服务端渲染。
除了Java等服务器这种传统的HTML方式外,Astro还支持Node,Netify等服务器,具体教程请参考 服务器渲染
这里以Netify作为示例:
安装服务器:npx astro add netlify编写页面:---
export const prerender = false // 设定这是一个服务端渲染页面,在不同用户进入时根据实际情况动态生成页面并返回前端,前端得到的就是一个已经渲染好的页面
interface Product {
title: string
}
const response = await fetch('https://dummyjson.com/products') // 从API请求数据
const json = await response.json() // 解析返回的json数据
const products: Product[] = json.products // 得到数据并塞入集合中
---
{products.map(x =>
<p>{x.title}</p> // 遍历展示数据
)}群岛
概念:上面我们制作的页面基本都是在构建完成后就是纯静态的HTML页面,没有任何交互,为了解决交互问题,Astro可以指定一个区域用于加载JS,就可以做到有需要时加载,其他情况保持静态,保证浏览器的加载速度。
添加预渲染:
- 这个预渲染框可以支持 React, Vue, Svelte 等
npx astro add preact在src/components/下创建Greeting.jsx,注意扩展名,这不是使用Astro编写
import { useState } from 'preact/hooks';

export default function Greeting({messages}) {

  const randomMessage = () => messages[(Math.floor(Math.random() * messages.length))];

  const [greeting, setGreeting] = useState(messages[0]);

  return (
    <div>
      <h3>{greeting}!感谢来访!</h3>
      <button onClick={() => setGreeting(randomMessage())}>
        新的欢迎语
      </button>
    </div>
  );
}
在页面中进行引用:
---
import Greeting from "../components/Greeting";
---

<html>
  <head> <meta charset="utf-8" /></head>
  <body>
    <Greeting client:load messages={["Hi", "Hello", "Howdy", "Hey there"]} />
  </body>
</html>
注意
client:load这个属性标识,它标识了这个组件的JS应该在什么时候加载client:load(立即加载)client:idle(空闲时加载)client:visible(可见时加载 )client:media(满足条件时):<MobileMenu client:media="(max-width: 768px)" />client:only(仅限客户端渲染):<ComplexChart client:only="react" /> 或<ComplexChart client:only="vue" />
API
import.meta.glob
扫面指定目录下的文件并返回数据
---
import BaseLayout from "../layouts/BaseLayout.astro";

const allPosts = Object.values(
  import.meta.glob("./posts/*.md", { eager: true }),
); 	// import.meta.glob() 将返回一个对象数组,每个博客文章对应一个对象。

const pageTitle = "我的 Astro 学习博客";
---

<BaseLayout pageTitle="{pageTitle}">
  <p>在这里,我将分享我的 Astro 学习之旅。</p>
  { allPosts.map((post: any) => (
  <li>
    <a href="{post.url}">{post.frontmatter.title}</a>
  </li>
  )) }
</BaseLayout>
解释:
import.meta.glob 返回一个对象,Object.values() 得到数组中的值 const allPosts =
Object.values( import.meta.glob("./posts/*.md", { eager: true }), );
自定义参数:eager: true 是否将得到的内容一起编译到文件中 数组存放: [ {
frontmatter: { title: "第一篇", date: "2024-01-01" }, default: [AstroComponent],
url: "/posts/post-1", file: "./posts/post-1.md" }, { frontmatter: { title:
"第二篇", date: "2024-01-02" }, default: [AstroComponent], url: "/posts/post-2",
file: "./posts/post-2.md" } ] frontmatter:在--- --- 中定义的变量
default:组件,用户渲染MD中的HTML文件, 类型Function / AstroComponent
url:自动生成的访问路径 file:文件相对路径
getStaticPaths()
动态路由,返回包含这个标签的页面数组
- 创建动态标签页:
src/pages/tags/[tag].astro,注意这个标签页的写法:[tag].astro,需要写getStaticPaths()函数,这个函数告诉Astro怎样生成这个动态页面。
---
import BaseLayout from '../../layouts/BaseLayout.astro';

export async function getStaticPaths() {
  return [
    { params: { tag: "astro" } }, # params告诉astro生成怎样的访问路径
    { params: { tag: "successes" } },
    { params: { tag: "community" } },
    { params: { tag: "blogging" } },
    { params: { tag: "setbacks" } },
    { params: { tag: "learning in public" } },
  ];
}

const { tag } = Astro.params;
---
<BaseLayout pageTitle={tag}>
  <p>包含「{tag}」标签的文章</p>
</BaseLayout>在构建时扫描MD文件的tags: ["blogging"],blogging在我们扫描的范围内,会将这个标签提取出来,访问http://localhost:4321/tags/blogging即可查看有哪些文章包含了这个标签,他是由[tag].astro来生成的。
现在只是展示了有哪些页面,能否加上页面的访问地址呢?
- 使用我们上一个学习的API拿到页面访问地址
---
import BaseLayout from '../../layouts/BaseLayout.astro';

export async function getStaticPaths() {
  const allPosts = Object.values(import.meta.glob('../posts/*.md', { eager: true }));

  return [
	#  	params决定生成怎样的访问路径,props决定这个页面有哪些数据
    {params: {tag: "astro"}, props: {posts: allPosts}},
    {params: {tag: "successes"}, props: {posts: allPosts}},
    {params: {tag: "community"}, props: {posts: allPosts}},
    {params: {tag: "blogging"}, props: {posts: allPosts}},
    {params: {tag: "setbacks"}, props: {posts: allPosts}},
    {params: {tag: "learning in public"}, props: {posts: allPosts}}
  ];
}

const { tag } = Astro.params; # 当前生成页面的标签
const { posts } = Astro.props; # 所有文章的数据
# filter 遍历检查,post.frontmatter.tags 当前文章的数组标签,includes(tag)在所有标签中查找。整个函数的作用就是遍历每篇文章的标签,若存在我们上面定义的标签( return [])将这个标签加入与文章数据加入到filteredPosts
const filteredPosts = posts.filter((post: any) => post.frontmatter.tags?.includes(tag)); // 筛选仅含指定标签的页面
---
<BaseLayout pageTitle={tag}>
  <p>包含「{tag}」标签的文章</p>
  <ul>
	// 得到链接,标题
    {filteredPosts.map((post: any) => <li><a href={post.url}>{post.frontmatter.title}</a></li>)}
  </ul>
</BaseLayout>

# 这里可能有一些复杂,我们分开看待,我们将--- --- 中的内容分成两部分看待 getStaticPaths()函数与其他内容
export async function getStaticPaths() {
  const allPosts = Object.values(import.meta.glob('../posts/*.md', { eager: true }));

  return [
    {params: {tag: "astro"}, props: {posts: allPosts}},
    {params: {tag: "successes"}, props: {posts: allPosts}},
    {params: {tag: "community"}, props: {posts: allPosts}},
    {params: {tag: "blogging"}, props: {posts: allPosts}},
    {params: {tag: "setbacks"}, props: {posts: allPosts}},
    {params: {tag: "learning in public"}, props: {posts: allPosts}}
  ];
}
# getStaticPaths()函数:它独立于[tag].astro页面存在,也就是说在构建时这个函数并不在[tag].astro这个模板文件中执行。它独立运行
# 每次将{params: {tag: "astro"}, props: {posts: allPosts}} 传递给一个[tag].astro页面,一个params代表一个访问路径,也代表Astro需要生成一个对应的文件
# props中的内容是给这个新生成的页面的数据

# 如上面的getStaticPaths()函数有6条,就生成6个页面,并将其中的数据给对应生成的页面
# 如第一次生成“astro”标签,下面的const { tag } = Astro.params; 接收“astro”,const { posts } = Astro.props; 接收全部页面的标签数据,经过posts.filter筛选后filteredPosts 存放的就是“astro”这个标签,在哪些文章中存在
# 下面的模板组件<BaseLayout pageTitle={tag}> 遍历这个数据即可
---
import BaseLayout from '../../layouts/BaseLayout.astro';
const { tag } = Astro.params; # 所有标签路径
const { posts } = Astro.props; # 所有文章的数据
# filter 遍历检查,post.frontmatter.tags 当前文章的数组标签,includes(tag)在所有标签中查找。整个函数的作用就是遍历每篇文章的标签,若存在我们上面定义的标签( return [])将这个标签加入与文章数据加入到filteredPosts
const filteredPosts = posts.filter((post: any) => post.frontmatter.tags?.includes(tag)); // 筛选仅含指定标签的页面
---
<BaseLayout pageTitle={tag}>
  <p>包含「{tag}」标签的文章</p>
  <ul>
	// 得到链接,标题
    {filteredPosts.map((post: any) => <li><a href={post.url}>{post.frontmatter.title}</a></li>)}
  </ul>
</BaseLayout>

# 整个页面的生成就分成了,得到所有标签,将所有文章的数据给“上面的第二部分”生成页面即可。“上面的第二部分”其实就是上面介绍的将数据传入一个组件并展示。
这里存在一个问题,用户不知道有哪些标签怎么办?
- 制作一个聚合标签页,创建
src/pages/tags/index.astro这么一个文件,tags/index.astro标签的默认页面,访问http://localhost:4321/tags/即可
---
# 得到所有文章的数据
const allPosts = Object.values(import.meta.glob('../posts/*.md', { eager: true }));
# allPosts.map((post: any) => post.frontmatter.tags 得到所有文章的书签集合,.flat()组合一个数组,放到Set中,Set不允许重复数据,这就得到了有哪些不重复的标签
# ... 展开运算符,将Set转换成数组
const tags = [...new Set(allPosts.map((post: any) => post.frontmatter.tags).flat())];
---
# 遍历唯一标签即可,通过链接转到对应的标签与文章的对应页
<BaseLayout pageTitle="标签索引">
  <div class="tags">
    {tags.map((tag) => (
      <p class="tag">
        {/* 这里的 href 就指向了你上一节生成的 [tag].astro 页面! */}
        <a href={`/tags/${tag}`}>{tag}</a>
      </p>
    ))}
  </div>
</BaseLayout>
配置文件
astro.config.mjs
这是Astro服务器的默认配置文件。
更改监听地址
Astro默认监听默认只绑定 localhost,使用IP+端口访问会失效解决方案1:
npm run dev -- --host 0.0.0.0
解决方案2:astro.config.mjs 配置
export default defineConfig({
server: {
host: '0.0.0.0',
},
});